Showing posts with label tutorial. Show all posts

Thursday, November 14, 2013

Password Keeper Tutorial on Splitcoast Stampers


Over a year ago, Beate Johns asked if I would create a tutorial for Splitcoast Stampers.  Finally, the day is here! 

Head over to Splitcoast Stampers to see my tutorial.  There you will also be able to downloadable/printable template so you can create your own password book.  If you are not already a member at Splitcoast Stampers, don’t worry, it is free to join.


Here is a peak at my books.  Remember, you can get all the details at Splitcoast Stampers.


2013-11-14 SCS passwordbook 1 wm

2013-11-14 SCS passwordbook 2 wm

2013-11-14 SCS passwordbook 3 wm


You can find links to the books I made in the past HERE and HERE.

Thank you for stopping by today.  Please head over to Splitcoast Stampers and let me know what you think!


Challenges:

Wednesday, March 21, 2012

Tutorial: Create your own rub ons

A while ago I saw a tutorial on Pinterest about creating your own rub ons. In the tutorial, the person created an entire sheet of the same rub on. While I thought it was cool, I couldn’t think of when I would use the technique.

This past weekend, when I was working on a card and trying to get a sentiment I typed up on my printer centered on a little die cut tag, the light bulb went off. How much easier could it get other than creating a rub on, centering on the tag, and rubbing away? So now that I have connected the dots on how useful this can be to an average paper crafter (like me) I thought I would share to see if I could make some one else’s paper crafting life a little easier.

I put together this photo tutorial to show you how easy it is. All you need is a printer, a blank transparency sheet, and a popsicle stick.

First, create your sentiment in Microsoft Word. This would work for a sentiment you type yourself or a digi stamp sentiment. (Think of the fun sentiments you can make with all the free fonts available for download!) For my example, I am using the sentiment I created and used for this card. (I apologize if the screen shots look a little blurry. They look sharp in my photo editing program but they seem to be a bit blurry here.)

Fullscreen capture 3182012 10323 PM.bmp

The trick comes when you print it. Click “Print”. You will see a screen like the one below, then click “Properties”.

Fullscreen capture 3182012 10348 PM

From here, you will want to look for the option that says “Mirror Image” and click the drop down box to “On”.

Fullscreen capture 3182012 10406 PM

Load your transparency into your printer and then click “OK” to print your rub on.

Be careful removing from the printer. The ink may still be wet and you don’t want to smear it.

Unless you are going to print some more rub ons, you will want to go back into your print properties and toggle the “Mirror Image” back to “OFF” or anything else you print will be reversed too.

At this point, when you are ready, you can use your custom made rub on just like any other rub on.

Place your rub on with the ink side down where you want to apply it. (You should be able to read the text at this point.) Holding it carefully so that it does not slide, use a popsicle stick to thoroughly rub over the ink to apply it to your paper.

rubon2

(Do you know how hard it is to apply a rub on and take a picture at the same time?) Below is the finished product.

rubon3

Now you are ready to finish your craft project. Isn’t this great? It is perfect for getting custom sentiments on tags or other die cuts. I used this technique several times over the weekend using the same transparency. I cleaned it in between uses with stamp cleaner and a paper towel. I don’t know home any times I can print over the same area, but there is a lot of room to print sentiments on a single transparency. It seems to be pretty cost effective.

You can see the finished product (on another tag) on this card.

2012-03-20 WSS Chick card WM

I hope you will find this tutorial useful. If you do, I would love to see the projects you make using this technique. Leave a link in the comments and I will drop by.

Edit: I have received some questions in email and comments. I will try to answer them here to clarify the tutorial.

You can purchase transparencies at any place that carries office supplies. I Googled it and found out that the correct name is “Transparency Film”. Here is a link to a sample. I have found a variety of prices.

You probably can use acetate. Acetate is a bit thicker and probably would work. I’m not sure and I don’t have any to experiment with. If any one tries this, let me know the results.

While the ink is wet, it will smear quite easily. I have not tried to print a sheet and storing them. I have used them right away. I would think that you would store them as long as you were careful and they didn’t rub on anything or get scratch.

While you are here, don’t forget to check out my March Followers Blog Candy of 2 MME paper pads. Click on the picture for details.

Have a great day!

Shared on Whatever You Want Wednesday at Free Pretty Things For You! , Top Tip Tuesday, & Tater Tots & Jello Week end Wrap Up Party


Wednesday, March 7, 2012

Tutorial on Faux Brads


I have a short tutorial on the Meljen’s Designs blog showing how I made the faux brads I used on this card last week.  Stop by if you would like to see it.


(You can see the original post for this card with the list of supplies used HERE.)


Sorry about the scab on my knuckle in the photos.  My little parrot decided to give me a nip last week. (The little stinker….)


Have a great day!  I’ll be back tomorrow with my weekly Meljen’s Designs DT project post.

Monday, November 15, 2010

Rosette tutorial

Several people said they would like to see a tutorial for the rosettes that I made on these cards last week. The pictures are not the best, I am taking them on Sunday night and don't have good light, but you will definitely be able to get the idea. I am using some scrap paper for my demonstration.

You will need:
Paper strip cut to 1-1/2 x 12 inches
Small circle of paper (for the bottom)
Scoring tool
Strong adhesive
Embellishment for top of rosette


The first step is to decide how wide you want the rosette. I wanted one approximately 3-inches wide, so I cut a strip of paper 1-1/2 inches wide and 12-13 inches long. If your paper is not long enough, you can connect two strips of paper to form one longer one.


If you want a rounded or fancy edge on the rosette, punch one edge of your paper strip. I used a scalloped edge punch on my rosettes.

Then score the paper to make it easier to fold. I just used my embossing tool and my paper cutter to score between each scallop.


Accordion fold your paper on each score mark. This is also a good time to cover your circle with adhesive.

Put adhesive on one end of the accordion folded paper. Pinch the sides together to make a circle.

Adhere the rosette to the adhesive covered circle to hold your rosette in shape.


Here is a peek at the back side of the rosette.


Then you can decorate the top side as you would like.


I hope this all makes sense. If you have any questions, please email me at shestamps11-blogs at yahoo dot com.

Thanks for looking!

Monday, March 8, 2010

(Faux) Stitching with Lindsay & a Paper Piecing Tutorial


Update - Please stick with me to the end of the post to see how one lucky winner will get the Doodle Flowers digital stamp set.
.
This week Lindsay challenged her DT to use stitching in our projects. I made this card using her Doodle Flowers set. Since the images already incorporate stitching, I just added some faux stitching to the various layers to pull it together.


Here is a better look at the Doodle Flowers digital stamp set. Isn't it a great set? It is very versatile and both coloring or paper piecing work really well with it. Stick with me to the bottom of this post to find out how one lucky person will win this set.

'I have had a few friends ask me questions on how to paper piece using digital stamps. Since I love paper piecing and wanted to share the fun, I put together a little tutorial to show how I do it.


First, pick out the image you want to use and decide how many layers you want. If you decide to add a layer later is it no big deal but I try to get it done all at once.
For my card, I decided I wanted 4 layers so I printed the flower out four times on a single page of cheap, printer paper. I always write the size of the images somewhere on the page in case I close out Word and then need to go back and reprint something. This has saved me a lot of frustration in the past whether I was paper piecing or coloring the images.
.

Next, I cut the pieces of CS or DP that I want to use for my pieced layers. Cut them slightly larger than the portion of the image you want to piece. Remember you will need enough around the edge to adhere your tape with out it covering the lines of the image. (My pieces are a little big but I wanted it to look nice for you.) I usually use painters tape because it comes off easily with out tearing the paper at all. Scotch tape also works but sometimes it does not come off as easily as the painter tape for me. The tape should be on the edge of the paper that feeds into your printer so that the pieces of paper do not jam your printer. Print your image(s) again.
.


This is what it looks like when it comes out of the printer again. At this point you cut out your images and adhere together. Trust me, it is easy peasy. (Note: If there is any printing on the tape, be careful, it can smear. This is the voice of experience talking.)
.
Now for the good stuff. Do you want to try your hand a paper piecing with this digital stamp set? Lindsay gave me a set to give away. (Thank you Lindsay!) Leave a comment on this post for your chance to win the Doodle Flowers digital stamp set. I will pick one lucky winner Sunday evening and will announce it in my post next Monday.
.
Thank you for sticking with me. I hope you will give paper piecing with a digital image a try.
.
Now on to some other DT news. Sadly, Nettie is leaving the Lindsay's Stamp Stuff DT. We all enjoyed seeing her lovely creations and will miss her. We also have a new member on the DT. Jessica is joining us starting today. Please stop by the rest of the DT to see how they used stitching on their projects. They are:
.
Lindsay (Owner)
.
SUPPLIES:
  • Images: Doodle Flowers from Lindsay's Stamp Stuff on mygrafico.com
  • Papers & CS: Perfect Day DP, Tulip, Sorbet, Cocoa, Juniper CS all from Close To My Heart, Stampin' Up white CS
  • Inks: Stampin' Up Close to Cocoa
  • Embellishments: K & Company Wild Saffron adhesive paper ribbon, Stampin' Up Chocolate Chip marker, DMC floss, paper piercer
  • Techniques: Faux stitching, paper piecing
CHALLENGES for this card:

Tuesday, February 9, 2010

Build your own light box

I just wanted to share this post I saw on Jenn's Papercuts. She shows how to easily build your own light box for taking pictures of your cards and art. I think I know what I am doing after I pick up DD from school today! Thanks Jenn!

Monday, February 8, 2010

Valentines Treats with Lindsay


This week Lindsay (of Lindsay's Stamp Stuff) asked us to make some cute packaging for some Valentine's Day treats. I made 2 projects using Love Grows Here. The first is a project that I did on my own and the second is a project that I made with my 8-year old daughter.

I designed this box myself using Spellbinders Label One die for the top and bottom and using strips of paper to make the sides. Once I got my head wrapped around it, it was pretty easy and made a cute little box. I will put the details at the bottom of this post if you are interested. I used my Cricut to cut the heart and the "4" and "U" and paper pieced the little bird.

My daughter also wanted to make some Valentine treats. I already had an idea of what I wanted to do, but I thought I would let her do it to gage how easy it would be for a kid to make. Overall, I would say pretty easy with help from a parent to help with the printing and cutting. DD was able to trace the templates, cut, color and assembly mostly on her own.

To make the bag topper, I printed out 2 copies of Lindsay's printable recipe template from Recipe Digital Stamp set (at 65% & 63% of original size) to use as a template. (It is folded over the top and is just straight on the back.) I picked these sizes because they fit my little bag. You could also use almost any one of the Nesties label dies that you have, but I wanted to give it a go with out using Nesties just to see what I could do with out them.

The circle tag was a freebie from Lindsay's blog. (And, in case you were wondering, yes, this is for Troy Bolton. If you have daughters you probably know who that is. If not, trust me you are not missing much. I wonder if he is going to show up to get his treats?)


I hope you enjoyed my projects and have a very Happy Valentine's Day. Remember, if you want the instructions to make the little box, stick around and read them at the very bottom of the post.

Please stop by the rest of the DT to check out their projects.


Challenges for Treat Box:
All that Scraps - Valentine Packaging
Charisma Challenge - #5 I love you
C.R.A.F.T. challenge - #36 Love/Valentine
Crazy 4 Challenges - C4C23 Be My Valentine
Creative Card Crew - #44 Valentines
Cute Card Thursday - #98 Dots & Spots
Dare U 2 Digi Stamp - #30 Hearts & Valentines
Fussy & Fancy - #3 Hearts
Lexi's Creations - #7 Spotted or Striped
Lilli of the Valley - Valentines
PaperPlay challenge - Week 5 Love Notes
Polka Doodles - #5 Paper Piecing
Penny's Challenge - Valentine/Love
Pile it On - #5 To the One You Love
Raise the Bar - Hearts
Stampin' for the Weekend - Love is in the air
Stamp Something - Love Somethings
Stamp with Fun - #45 Hearts


Supplies for Treat Box:
  • STAMPS: Love Grows Here digital stamp set by Lindsay's Stamp Stuff at mygrafico.com
  • PAPERS & CS: Love Nest by My Minds Eye, misc. brown textured CS, white Georgia Pacific CS
  • INKS: none
  • EMBELLISHMENTS & TOOLS: George & Basic stamps Cricut cartridge, fiber, buttons, DMC floss

Supplies for Treat Bag:

  • STAMPS: Love Grows Here & Recipe digital stamp set, by Lindsay's Stamp Stuff at mygrafico.com, Valentine Tag freebie digital stamp set by Lindsay's Stamp Stuff
  • PAPERS & CS: Georgia Pacific white CS, misc red CS
  • INKS: none
  • EMBELLISHMENTS & TOOL: pop dots, Stampin' Up markers, small bag
Instructions for the Treat Box:

Stick with me, this is the first box I made on my own (with out a template or using my Cricut) and it was pretty easy. I will explain the best I can. I have some photos but they didn't turn out well. The lighting was horrible. Click the pictures to make them larger.

First cut out the shape you want to use for the top and bottom of you box. I used the 2nd largest die from Spellbinders Label One Nestabilities die set. Use sturdy card stock. To make the sides of the bottom part of the box, I cut a strip 1-1/2 x 11 inches long. I scored the long way at 1/2" on the side that will be inside the box. Then, scoring the short way across the strip, I scored the width at every 2-3/4". You will be creating the 4 corners of the box and have a little piece left over. It will look something like this picture.
I then clipped the score marks that would be in the corners at the bottom of the box so that the paper would fold easier.

I then used adhesive along the narrow bottom flap and attached to my box bottom. Use a strong adhesive so that it stays together. It will look something like this.

I cut and adhered a piece of DP to the inside to make it look nicer.

I then followed similar steps to make the top of the box. I cut a piece of paper that was about 1 x 11". I scored at 1/2" to make the strip that adheres to the top of the box. Then I scored the strip to make the corners at a little less than 2-3/4" so that it would slip into the bottom to put the lid on. I have to admit I didn't write down the exact measurements. (Sssshhhh don't tell any one but I hate fractions.)

I hope these instructions make sense to you. If you have any questions please leave them in the comments or you can email me using the addy in my profile and I will answer as quickly as I can.

Thank you for sticking with me for this long post!

Thursday, February 4, 2010

Let Your Dreams Take Flight! Embossing Using a Digi Stamp

I don't know if you can tell, but I have been spending a lot of time on Michelle Zindorf's blog and was especially inspired by her tutorial titled Butterfly Season #227 tutorial. If you never have looked at her blog, get over there. This lady is truly amazing. While I didn't copy her outright, I tried to incorporate some Zindorf style and also used the same colors.


Believe it or not, you can still emboss with digital stamps. I printed this lovely butterfly (from Winged Things digital stamp set from Lindsay's Stamp Stuff) on glossy white paper. (Tip: Rub with an embossing buddy and blow off the dust before putting in your printer.) As soon as the image came out of the printer, I dumped my clear embossing powder on it. Through trial and error I have found that the finer the embossing powder, the better it sticks when using digital images. I tapped off the excess and heated it using my heat tool. If the powder does not stick in any area, you can touch it up using your Versa Mark or embossing pen, although I did not need to do that. I used the glossy paper from Stampin' Up here but you can use any glossy paper or paper that does not absorb the ink quickly when embossing digital images. The PaperTemptress has several types of paper that would work. I have used the Silver Lustre paper and was impressed with the results. (In fact, I am hording some right now. I am going to try to make it a goal to make a project with this lovely paper soon.) You might be able to use glossy photo paper but I have not tried it. I do know that my photos smear if I touch them too soon after I print them so the ink must take a while to dry.

After I was done embossing the image, I colored it using my Stampin' Up markers in a similar manner to Michelle. In between colors I gave it a blast from my heat tool to make sure the ink was dry so as to not muddy the colors. When I was satisfied with the coloring (and the ink was dry) I went over the entire image with my embossing pen and embossed it one more time with clear embossing powder (just like Michelle's tutorial). I then sponged and stamped my background. The great thing was that I did not have to mask my butterfly when sponging because any ink on it would wipe off.

Now I know this seems like it might be a labor intensive or a daunting project, but it wasn't. Once the heat tool is plugged in, you are ready to go. For me the hardest part was walking back and forth to get my supplies (because I don't have a craft room).

Since I made two butterflies at the same time in case I made a mistake with one, I cut out the extra and used it for the inside of the card.


I hope you enjoyed this post and apologize that it was so text heavy. If you have any questions on embossing with a digi stamp, please feel free to leave me a comment or email me using the addy in my profile. Let me know if you would like to see a tutorial. If enough people want to see it, I will put one together.
Please remember that Friday is National Wear Red for Women day here in the US to raise awareness of heart disease in women. If you would like more info, please click the link in the side bar.
.
Challenges for this card:
Andrea's Stampin' Moments - SS300110 Sketch
Crafty Creations - #53 Wings
Fab 'n' Funky - #9 - Emboss It!
Flutter By Wednesday - #95 Open Challenge
.
SUPPLIES:
  • STAMPS: Winged Things digital stamp set by Lindsay's Stamp Stuff, Take Flight by Gina K. Designs, Key To My Heart by Close To My Heart
  • PAPERS & CS: Stampin' Up glossy white, Always Artichoke, So Saffron, and Whisper White CS, Paper Studio black CS
  • INKS: All Stampin' Up - So Saffron, More Mustard, Pumpkin Pie, Really Rust, Ruby Red, Basic Black
  • EMBELLISHMENTS & TOOLS: Ranger clear fine embossing powder, Zig Emboss Writer, Provo Craft Floral Fanatasy embossing folder, Hero Arts black gemstones, Stampin' Up markers in Apricot Appeal, More Mustard, Pumpkin Pie, and Close to Cocoa, heat tool, embossing buddy
  • TECHNIQUES: Embossing a digital image


Thursday, December 3, 2009

Lindsays Stamp Stuff & My First Tutorial


I love the cup of hot cocoa from the Lindsay's Stamp stuff Warm Winter digital stamp set . You can purchase from Lindsay's Stamp Stuff Shop at ShopHomemade where the everyday special is spend $5 in digital stamps and get a free stamp. I just had to use my chocolate scented embossing powder on the cocoa. Along with the liquid applique, it almost looks real!

While you are out surfing the web, check out Lindsay's blog. She has great ideas, tutorials and freebies. (Don't you just love freebies??!!) She also has links to the rest of her DT blogs so you can check out their projects.

I also used the Mojo Monday sketch (MOJO114) from last week. I did not get the card done in time to post for the sketch challenge but I still wanted to share it with you.

Following is a quick tutorial on how to match the color of your computer generated sentiment to your Stampin' Up or Close To My Heart Paper. It only takes a few steps in Word and it is well worth the effort. If the pictures below are too small to see, you should be able to click them to enlarge.

Follow these steps:


1) Open a new document Microsoft Word


2) Type in your text using the font / size that you desire.


3) Click the Font Color button.


4) Click the "More Colors" option


5) When the box opens, make sure you are on "Custom" and you can type in RGB (Red, Green, Blue) code for the color your desire. You can find most of the Stampin' Up RGB and many of the Close To My Heart RGB codes
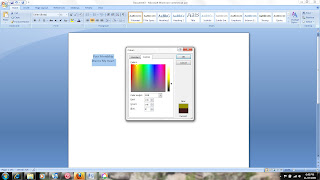
 HERE on Splitcoast Stampers or you can also find a link in my side bar. In the example below, I typed in the values for Stampin' Up Old Olive. (Note, I changed to Real Red on my final card.)


6) Click "OK" and you are done. When printing, make sure you use a color printer. (I have accidentally printed in just black & white before).

If you have any questions, please feel free to email me at shestampsblog@yahoo.com. Please leave a link in comments to anything you make using this tutorial. I would love to see it.

Thank you for looking!

Supplies:

Warm Winter Wishes by Lindsay's Stamp Stuff

Stampin' Up Dashing Designer Paper

Stampin' Up Real Red, Old Olive and River Rock card stock

Ribbon

Chocolate Bliss scented embossing powder by Gelly Powder

Liquid Applique

Crystal Effects (on candy cane)